
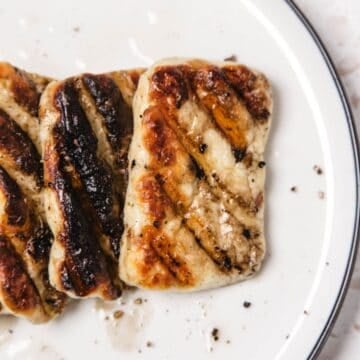
Mastering how to grill halloumi has become second nature to me. I've learned the perfect timing for those golden, crispy edges and a soft center. This recipe rewards attention, resulting in a dish so delicious it barely makes it to the plate intact. Once you've mastered grilling halloumi, use it to make Easy Grilled Halloumi Burger, Halloumi Tacos or Aroma Espresso Bar Fried Halloumi Salad for easy Mediterranean-inspired meals.

My grandfather used to cross borders with stranger things than cheese.
Tea wrapped in cloth. Seeds tucked into coat linings. Dried mushrooms sealed in old jars that smelled faintly of forests after rain. Once, a parcel of pickled vegetables arrived at our apartment wrapped in newspaper so thoroughly stained with beet brine that my grandmother refused to let it touch the table.
So when I first carried halloumi home in my suitcase after a trip, sliding the blocks carefully between sweaters, it felt strangely familiar. Like something inherited rather than learned.
Halloumi travels well. Maybe that is part of why so many immigrant kitchens hold onto it. It survives long flights, crowded fridges, changing countries, and small apartments where ingredients become stand-ins for places you miss. In our home, one always stays untouched a little longer because I know eventually I'll want it over fire.

Halloumi itself has deep roots in Cyprus and across the eastern Mediterranean, especially in Greek, Turkish, Lebanese, and Israeli kitchens. Traditionally made from sheep's and goat's milk, sometimes with cow's milk added later, it was created as a cheese that could last through long summers without spoiling quickly.
That structure is exactly why it works so well on a grill. Instead of collapsing, it chars and bronzes, holding its shape while the outside turns crisp.
I've carried it into so many parts of our family table. Sometimes cut into thick fries for these spicy harissa halloumi fries when friends stay late talking around the table. Sometimes tucked into soft tortillas like these halloumi tacos, where the salty cheese settles against herbs and vegetables beautifully. Other nights it lands over greens the way it does in this fried halloumi salad inspired by Aroma Espresso Bar, the cheese still hot enough to soften the dressing underneath.
Still, grilling remains the version I return to most often. There is something grounding about standing near the fire watching each slice change color slowly. It reminds me that some foods survive because people carried them carefully across oceans and borders, determined to keep a piece of home intact.
Ingredients

Everything in this recipe circles back to the halloumi itself. Good halloumi changes completely over heat. The outside darkens and crisps while the center stays springy and soft enough to bite through cleanly. I usually look for blocks packed in brine with sheep's milk or a mix of sheep and goat's milk because they hold a deeper flavor once grilled. Cow's milk halloumi works too, though it tends to feel firmer and slightly milder.
Lemon matters here more than people think. Halloumi carries a salty richness that wakes up completely once fresh lemon hits the surface. I rarely serve grilled halloumi without it now. If lemons are unavailable, a small drizzle of pomegranate molasses works beautifully too, especially if you are serving the cheese alongside herbs or grilled vegetables. It pulls the recipe slightly closer to flavors I first tasted in Middle Eastern cafés, where salty cheese often arrived with sharp, tangy finishes.
The black pepper stays optional, though I nearly always add it. Freshly cracked pepper settles into the hot surface of the cheese and adds a little sharpness without covering the flavor underneath. Aleppo pepper can work in its place if you want something softer and slightly fruity.
Optional: if you want to serve this as an appetizer, drizzle it with a bit of olive oil and honey. It's perfection.
See the recipe card for full list and exact quantities.
Top Tips
Buy Halloumi Packed in Brine - the best grilled halloumi usually comes packed in brine rather than vacuum-sealed dry. The texture stays softer inside once grilled, and the cheese browns more evenly instead of turning stiff too quickly. I started paying attention to this after buying different brands for years and noticing how some stayed pleasantly springy while others became tough after a few minutes over heat.
Let the Grill Heat Longer Than You Think - halloumi needs strong heat from the beginning. A grill that feels "almost ready" usually is not ready yet. I wait until the grill pan is fully heated before adding the slices because cooler pans make the cheese stick badly and prevent those darker grill marks from forming properly.
How to Make Grilled Halloumi Cheese Recipe

Grilled halloumi cheese recipe comes together quickly, though the small details shape the final texture more than people expect. The difference between pale, rubbery cheese and deeply golden halloumi with crisp edges often comes down to heat, dryness, and patience during cooking. Here's what to watch for as you go:
Slice the Halloumi Evenly

- Try to keep the pieces as even as possible so they cook at the same speed. Thin slices soften too quickly and can tear when flipped, while overly thick pieces stay firm in the center before the outside fully browns.
Pat the Surface Dry

- Halloumi packed in brine carries extra moisture on the surface. If the cheese goes onto the grill wet, it steams instead of browning properly. A dry surface helps create those darker grill marks and crisp edges.
- The slices should feel dry to the touch before moving on. If they still look glossy with moisture, blot them once more.
Brush Lightly With Oil

- Too much oil can cause flare-ups on an outdoor grill and makes the cheese feel greasy instead of crisp around the edges. A light layer helps the surface color evenly and keeps the halloumi from sticking once it hits the heat.
- At this stage, the slices should look lightly shiny without oil pooling anywhere.
Heat the Grill Properly
- Preheat a grill or grill pan over medium-high heat before adding the cheese.
- If the grill is not hot enough, the cheese sticks stubbornly and stays pale. If the heat is too aggressive, the outside darkens before the center softens slightly.
Grill Without Moving Too Early

- At first, the cheese clings tightly to the grill grates. Once a crust develops, it releases naturally. Trying to flip too early often tears the surface and leaves pieces stuck behind.
- Flip carefully and cook the second side until equally golden. Both sides should carry clear grill marks and lightly crisp edges.
Watch the Texture Closely

- If cooked too long, the cheese becomes rubbery and overly firm once cooled. Pull it from the grill while it still feels slightly soft in the middle because it firms up more as it rests.
Finish While Hot

- Serve with lemon wedges alongside the hot cheese. Once squeezed over the surface, the lemon cuts through the saltiness and brightens the whole plate.
- Grilled halloumi is best eaten right away while the edges still carry that crisp texture and the center remains soft and elastic.
Storage

Grilled halloumi is best served fresh while crisp and soft. For leftovers, cool completely and store in an airtight container in the fridge for up to 2 days. Reheat in a dry skillet or grill pan over medium heat for a few minutes per side until the surface regains some color. Avoid microwaving if possible, since it changes the texture quickly and can make the cheese rubbery.

If you want to store it longer, grilled halloumi can be frozen for up to 1 month. Place cooled slices in a single layer between sheets of parchment paper so they do not stick together, then transfer to a freezer-safe container or bag. Thaw overnight in the refrigerator before reheating in a hot pan. The texture may become slightly firmer after freezing, though the cheese still browns well once reheated.
FAQs
This usually happens when the grill is not fully heated before the cheese goes on. Halloumi releases naturally once a crust forms underneath. If you try to flip it too early, it clings to the grates and tears. Make sure the grill is hot and leave the slices undisturbed for the first few minutes.
Moisture is usually the reason. Halloumi packed in brine needs to be dried thoroughly before grilling. If the surface stays wet, the cheese steams instead of browning. Patting it dry well and using medium-high heat helps create darker grill marks and crisp edges.
Halloumi becomes rubbery when cooked too long or reheated too aggressively. Pull it from the grill once both sides are golden but the center still feels slightly soft. The cheese firms up more as it cools.
No. Halloumi is made differently from many cheeses and holds its shape over heat instead of melting completely. That firm, slightly elastic texture is exactly what makes it one of the best cheeses for grilling.
Grilled or fried halloumi is delicious in burgers, tacos, grain bowls, salads, wraps, and as crispy fries served with dipping sauces.
Recipe
Tried and loved this recipe? Please leave a 5-star review below! Your reviews mean a lot to me, so if you've got any questions, please let me know in a comment.
How to Grill Halloumi (Grilled Halloumi)
Equipment
- Grill or grill pan
- Sharp Knife
- paper towels
- Plates
Ingredients
- 8 oz halloumi cheese
- 1-2 teaspoon olive oil
- black pepper optional
- lemon wedges optional, for serving
Instructions
Prepare the cheese
- Remove the Halloumi from its packaging and pat it dry with paper towels. This helps the cheese sear instead of steam.
Slice evenly
- Using a sharp knife, cut the cheese into ½-inch thick slices. Keeping the slices even helps them cook at the same rate and develop a consistent golden crust.
Lightly oil
- Brush both sides of each slice with olive oil. A thin coating helps prevent sticking while encouraging those signature grill marks.
Heat the grill
- Preheat a grill or grill pan over medium-high heat until fully hot. The surface should be hot enough that a drop of water sizzles immediately.
Grill the cheese
- Place the slices directly onto the hot grill. Cook for 2-3 minutes per side, without moving them too early, until distinct grill marks appear and the surface turns golden and slightly crisp.
Turn carefully
- Use tongs to gently flip each slice and grill the second side until equally golden.
Finish and serve
- Transfer the grilled cheese to a serving plate. Sprinkle with black pepper if desired and serve immediately with fresh lemon wedges for squeezing over the top.


Roma Hoffman says
Thank you for your detailed reciie directions! Without those I wouldn’t have been able to make it!!