
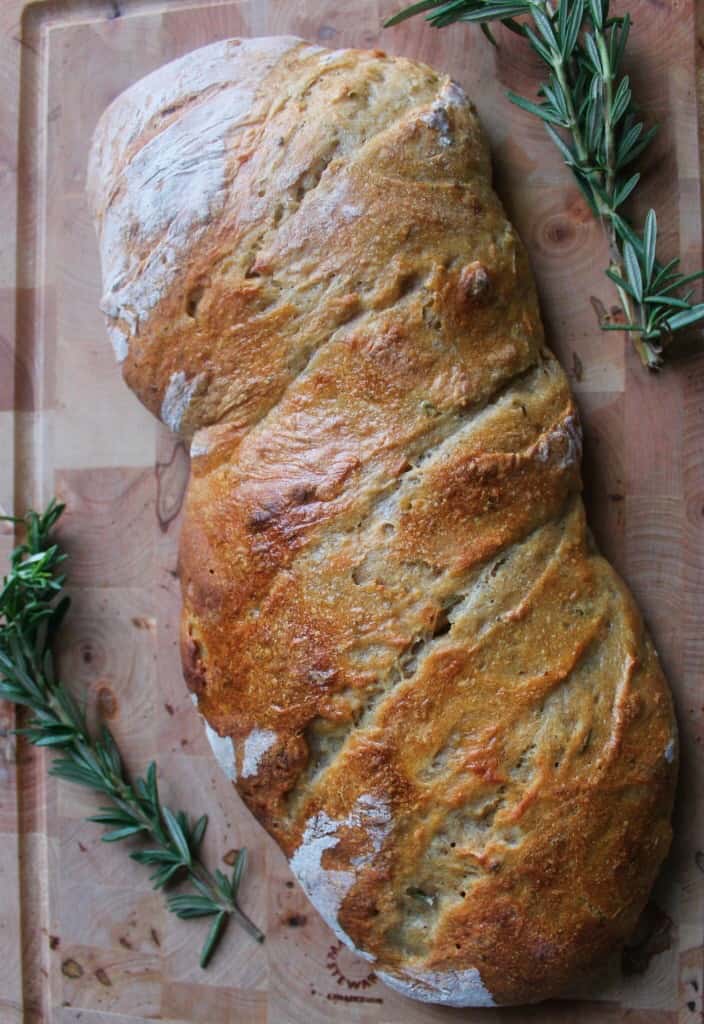
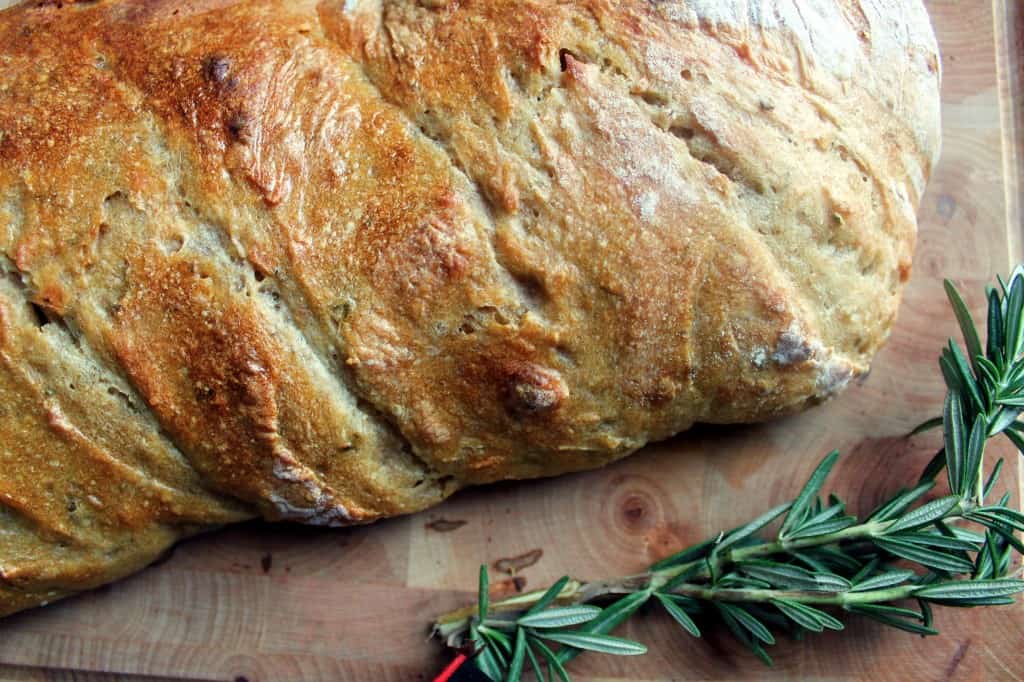
This crisp-crusted, golden Italian rosemary sourdough bread is interspersed with hearty, fragrant herbs, and is great with a smear of butter, or a dab of jam.
Adapted from Judith Fertig's wonderful 200 Fast and Easy Artisan Breads, a book every bread baker should have. This post contains affiliate links - thank you for supporting the brands that help make this blog possible.
Jump to:
- Sourdough Bread Memories
- For more bread baking recipes:
- The art of sourdough bread baking
- Baking our way through the pandemic
- Is Italian rosemary sourdough bread difficult to make?
- Falling in love with Italian rosemary sourdough bread
- What is Italian sourdough bread?
- What is so special about this Italian rosemary sourdough bread?
- Ingredients
- Can I add other flavorings to this Italian sourdough bread?
- How to make Rosemary Sourdough Bread
- FAQ
- See the Italian Rosemary Sourdough Bread Web Story
- Accompanying Dishes
- Pin for Later
- Recipe
Sourdough Bread Memories
There is a reason we associate sourdough bread with comfort.
The smell that wafts through our homes when fresh bread is laid on the table, the warmth of a working oven, the crackling of a well-crisped crust, and the bountiful shape of a loaf all speak to our senses, promising treasures and pleasures beyond the humble union of flour, water, and wild yeast. For a breakfast version, you're going to fall in love with my sourdough pancakes.
Its ability to fill us, to satiate that deep hole in our bellies that has been worn by time, the demands of modern life, and bottled up emotions are incomparable.
As much as I love salads, rice, roasted vegetables, and even the humble potato, few things speak to my soul as much as freshly baked rosemary sourdough bread.
For more bread baking recipes:
You must use the category name, not a URL, in the category field.
The art of sourdough bread baking
I love delving into sourdough bread making. It started with my journey to find the perfect starter (with help from Peter Reinhart and Tartine Bakery). Then continued to finding ways to shape, proof and score the perfect loaf. And finally, culminated with my attempts to orchestrate the perfect oven bread baking environment.
Though frustrating at times, sourdough bread baking is a form of meditation. I do not remember anyone in my family ever baking bread. Even my industrious grandmother Berta, who grew up on a semi-urban farm during war times and provided much of the family's food, has abandoned that pursuit when technology and money improved.
I can only assume my grandparents did not see the pleasures and benefits of bread-baking like I did.
To them, I imagine the pursuit of bread-baking seemed a wasteful drudgery, a labour from which even the Bolshevik revolution couldn't emancipate them quickly enough.
To me, it's a fanciful way of reconnecting to something earthen, pure, and of course, healthy.
For more sourdough bread recipes:
Baking our way through the pandemic
In these days of stress, I return to bread baking. When the demands of the world seem to multiply, while the temperatures continue to drop, and melancholy, exhaustion and a deep, deep hunger threaten to pummel me, I mix water, flour, and a bit of sourdough starter in order to create magic.
I give of myself to this mixture, shake it into a loaf of rosemary sourdough bread, and I hope it will be give back in sustenance and nutrients.
Is Italian rosemary sourdough bread difficult to make?
This rosemary sourdough bread is NOT difficult to make. Thanks to a special no-knead method, this sourdough bread recipe requires one thing only: time.
Be warned: Judith Fertig's 200 Fast and Easy Artisan Breads method is revolutionary - but it is time consuming.
But the end result of this soft-on-the-inside, crunchy-on-the-outside, rosemary-scented Italian sourdough bread is so worth it.
Falling in love with Italian rosemary sourdough bread
Having documented my initial experiments with sourdough, I have been feeling confident enough to try a different bread recipe.
I turned to a seemingly simple book, Judith Fertig's 200 Fast and Easy Artisan Breads. And the results were truly more than the cover would have suggested, though I did have to tinker with it just a bit to produce a rosemary sourdough bread.
This crisp-crusted, golden rosemary sourdough loaf is interspersed with strands of hearty rosemary, one of the only herbs that seems as at home in the bleak landscape of Winnipeg's winter as it does in the desert heat of the Israeli summer.
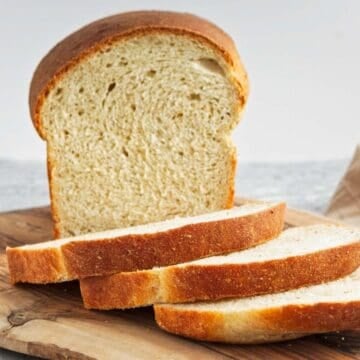
This rosemary bread loaf slices beautifully, serving as a resting pad for a smear of butter, a dab of jam, or a whole sandwich. And it comforts me.
And right now, that's the best part about it.
Note: for best results, bake this Italian rosemary sourdough bread on a pizza stone.
What is Italian sourdough bread?
Italian Sourdough bread is also called filone.
Filone is Italian for "line", and it refers to the elongated shape of the bread. Filone is often made with a special Italian bread starter called biga, which is only lightly fermented (see my sourdough starter recipe here).
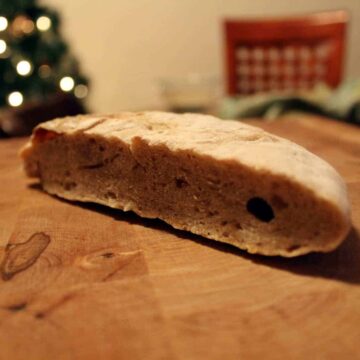
Filones like this Italian rosemary sourdough have a crunchy crust and a light airy crumb on the inside.
It makes it perfect for dipping into leftover pasta sauce or olive oil - just bake it and try for yourself!
What is so special about this Italian rosemary sourdough bread?
Long ferment helps develop flavor
The revolutionary thing about this rosemary sourdough bread is Judith Fertig's method.
She lets her sourdough rest an inordinately long amount of time - like, very long. The dough first ferments for 12-24 hours during the first rise, and then 5-8 hours during the second rise. The dough can even rest in the fridge for 3 days without any harm done to it.
No knead sourdough method
The second thing that's special is that there is NO KNEADING in this rosemary bread dough. Instead, you scrape the dough up and fold it over itself, flouring and turning it as you go, for 12 to 15 turns, or until the dough is soft and not sticky. This method is fantastic and results in soft, well-rested dough - and arms that don't ache!
Great-tasting, authentic Italian Filone
And finally, this Italian sourdough bread just tastes great. The rosemary is fragrant, the polenta creates a beautiful crust at the bottom of the bread, and the golden yellow color is very inviting.
No special equipment required!
I first baked this rosemary filone when I was very new to sourdough baking.
All you need is a baking sheet. A bench scraper would also be nice, but it's not necessary. I do, however, recommend using a kitchen scale for best results (as with all baking).
You DO NOT need a bannetone, a Dutch oven, a lame, a standing mixer, or a fancy proofing oven or drawer, as in other no knead rosemary sourdough bread recipes.
Just your hands, a baking sheet lined with parchment paper, and some patience.
Ingredients
To make this delicious Italian sourdough bread, you need mostly pantry ingredients:
- unbleached all-purpose or bread flour - bread flour has more gluten and takes to shaping better. But because this is a NO KNEAD rosemary sourdough bread recipe, you can use regular all-purpose flour.
- whole-grain flour - this gives the dough more structure, and better taste.
- fine kosher salt
- water - regular tap water is fine, but make sure you have both room-temperature water and hot water.
- 1 cup prepared and fed sourdough starter (if you're not sure if your sourdough starter is active, don't worry - I provide instructions on how to prepare your starter in the recipe body)
- fresh rosemary - this is what gives this rosemary sourdough its flavor, so don't skip it!
- cornmeal or polenta - this is used for dusting the bottom of the Italian sourdough loaf so it doesn't stick
- olive oil - for brushing
Can I add other flavorings to this Italian sourdough bread?
If you want to play with other flavorings in your Italian sourdough bread, be my guest! Just make sure you don't add more than another ¼ cup of toppings, and that the toppings you use are not too wet.
I also suggest adding in:
- Roasted garlic
- Dried onion
- Caramelized onions
- Diced olives
- Lemon zest
How to make Rosemary Sourdough Bread
Activate your sourdough starter
Two nights before you're planning to bake your bread, revive your starter: remove starter from fridge and let come to room temperature. Stir the starter well to recombine any liquid that may have gathered on the top. Measure out 1 cup of starter.
Place 1 cup starter in a large jar, bowl, or container, add 1 cup of water and 1.5 cups of flour, and mix until combined. The mixture will be lumpy, like pancake batter. Cover loosely with plastic wrap and keep at room temperature (I keep my starter on top of the fridge) overnight.
One day before you're planning on baking your rosemary sourdough bread, refresh your starter once more in the morning with 65 grams of water and 50 grams of flour.
The night before you're planning to bake, refresh the starter again with 65 grams of water and 50 grams of flour. The starter will be ready to use at night, or the next morning, when it bubbles and smells yeasty.
You will need 1 cup of refreshed starter.
Prep your ingredients
When ready to bake, chop rosemary finely. Prep all the ingredients for the bread.
Mix dry ingredients
Mix the bread flour and whole-grain flour in a large bowl, and stir with a wooden spoon to combine well. Add salt and chopped rosemary, and stir to combine.
Add water and combine
Pour in the water and starter and stir together until just moistened. Beat 40 strokes, scraping the bottom and the sides of the bowl, until the dough forms a thick, spongy mass.
Let dough ferment
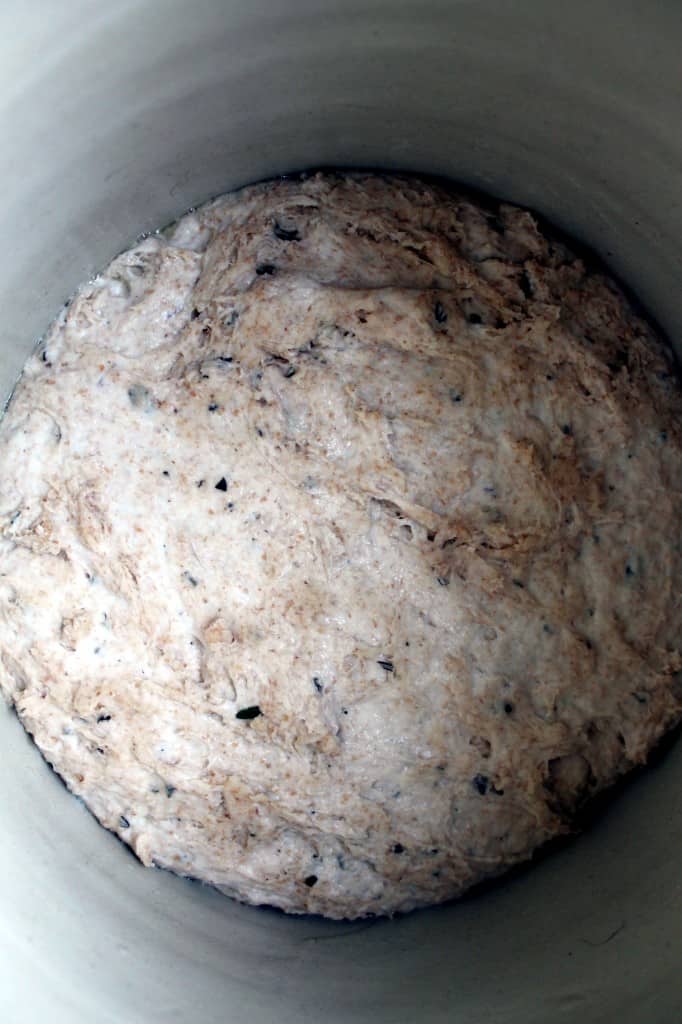
Transfer dough to an oiled crockpot or an oiled large glass bowl. Cover the bowl with plastic wrap or a large plate and let ferment at room temperature 72°F (22 °C) for 12 to 24 hours, or until the dough is bubbly on the surface, has a sponge-like appearance and has either doubled or risen by half. I place my bowl, covered, in an oven that is turned off, or simply under the table in the kitchen.
Use right away or place the bowl, covered with plastic wrap, in the refrigerator for up to three days.
Shape dough
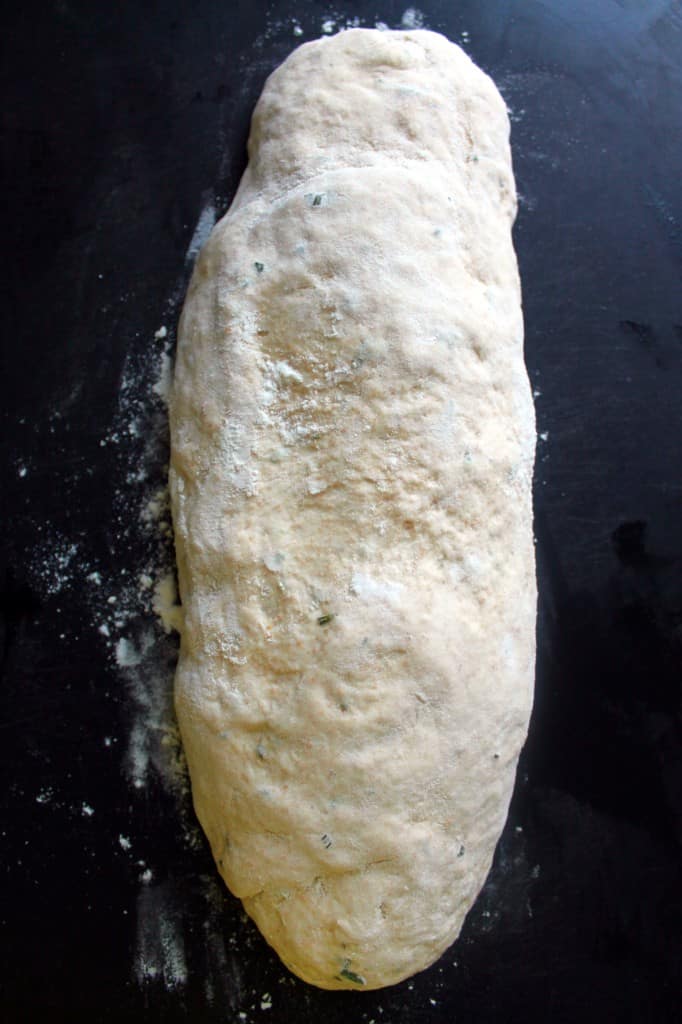
When dough is ready, place it on a generously floured surface and dust with more flour. Flour your hands. Using a dough scraper or floured hands, scrape the dough up and over itself, flouring and turning it as you go, for 12 to 15 turns, or until dough is soft and not sticky (this method is fantastic, and the dough is not overworked). Dust very lightly with flour.
Form dough into batard (or filone) shape
With floured hands, work the dough as little as possible and form it into a wide 10-12 inch batard. Pinch the ends and all seams closed, and lightly flour sticky spots. The dough should be smooth and soft, and not sticky. If sticky, add a bit more flour.
Prepare a baking sheet or cutting board (the bottom must be flat). Line it with a clean kitchen cloth, or parchment paper, and dust it with flour. Without moving your batard too much, use a dough scraper (or well-floured hands) to slide your dough onto the floured surface.
Let dough rise a second time
Cover the dough with plastic wrap sprayed with oil, oily side down. Let rest at room temperature (again, I use a turned-off oven) for 5 to 8 hours.
About 30 minutes before baking, place a broiler pan on the bottom rack of the oven. Place your baking sheet on in the middle of the oven.
Preheat oven to 450F.
Make slits on bread top
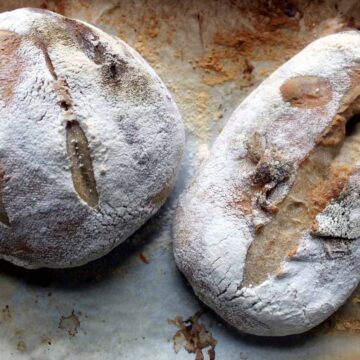
Remove plastic wrap from batard. Using a sharp knife, make three to five crosshatch slashes diagonally across the top of the loaf.
Transfer dough to baking sheet
Very carefully and wearing oven mitts, remove the hot baking sheet from the oven, and cover with parchment paper. Sprinkle the cornmeal on the paper. Using the dough scraper and well-floured hands, slide the bread from the pan onto the baking sheet, taking care to keep its shape. Place baking sheet back in the middle rack of the oven.
Pull lower rack of the oven halfway out, and pour 2 cups of hot water into the broiler pan. Spray batard with water, but take care not to drench it. Return rack into the oven, and close oven door immediately.
Bake Italian rosemary sourdough bread for 30 mins
Bake for 27 to 30 minutes, lightly spraying the loaf with water three times during baking. The bread will be ready when crust is golden-brown. Remove baking sheet from the oven, and, wearing kitchen gloves, remove bread onto wire rack to cool.
Cool your rosemary Filone before cutting
This is important - cutting into this bread hot will result in a gummy bread.
Be patient and let your rosemary filone cool before cutting into it.
FAQ
Absolutely - just go right ahead to step 4 if you are satisfied with your starter.
The starter refresher instructions are based on Judith Fertig's original recipe, and they're meant for a more liquid levain (like mine). If your starter is properly refreshed, feel free to skip to stage 4 and don't worry about hydration.
If you have a hiberanted starter in the fridge, it will take two days to revive it.
About 2 days. There's little active work involved, but the dough has to rest twice.
The dough first ferments for 12-24 hours during the first rise, and then 5-8 hours during the second rise. The dough can even rest in the fridge for 3 days without any harm done to it.
The baking itself takes only 30 minutes, so that's the easy part! I recommend to let the second rise take place overnight the day before you want your fresh sourdough bread, and then baking it in the morning.
For making this Italian sourdough bread exactly as instructed, you need:
2.5 cups (630g) water
nearly 6 cups (880g) all-purpose flour
½ cup (60g) whole grain flour
¼ cup (37.5g) polenta
To end up with 1 cup of refreshed starter, you need a total of 1.5 cups (380g) of water and 2 ¼ cups (325g) of flour.
You start off with one 1 cup of inactive starter.
Then you add 1 cup of water (250g) and 1.5 cups of flour (225g) to it.
Then next morning, you add ¼ cup (65g) water and ⅓ cup (50g) flour.
That night, you again add ¼ cup (65g) water and ⅓ cup (50g) flour.
You need about 1 cup (250g) of room temperature water for the bread. You may need up to ¼ cup more, depending on the texture.
You need 2 cups (500g) of unbleached all-purpose flour, and ½ cup (60g) whole grain flour plus more for dusting the bread.
Finally, you also need ¼ cup of polenta for the bottom of the bread, though this is not mandatory.
Yes, you do. This Italian rosemary sourdough will not come out the same if it's made with yeast.
No, it cannot. You really need the gluten to be active to create the airy crumb in this bread.
If you want gluten-free breads, try my gluten free cornbread.
Yes! It's made with only two types of flour, water, rosemary and cornmeal.
See the Italian Rosemary Sourdough Bread Web Story
To see our step-by-step animated web story about how to bake Italian Rosemary Sourdough Bread, check out this link.
Accompanying Dishes
Try this easy, no-knead Italian sourdough bread with:
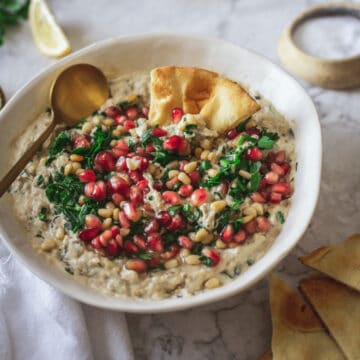
- Lebanese Baba Ganoush Recipe with Pomegranate Seeds and Pine Nuts
- Festive Cranberry Goat Cheese Bruschetta Recipe With Punchy Garlic And Herb Chermoula
- Members Only: Black eyed pea dip with tahini, tomatoes, garlic and hot peppers
- Honey Strawberry Jam (Oregano Blossom, Lavender, Thyme Variations)
- Summer Raspberry Preserves without Pectin
- Moroccan Zaalouk, Roasted Eggplant Dip
- Spiced Ground Cherry Jam (no pectin)
- Easy Baba Ganoush without Tahini
- Israeli Hummus Recipe


Pin for Later

Recipe
Tried and loved this recipe? Please leave a 5-star review below! Your reviews mean a lot to me, so if you've got any questions, please let me know in a comment.
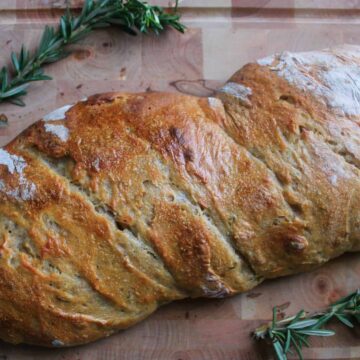
Golden Italian rosemary sourdough bread
Ingredients
- 2 cups unbleached all-purpose or bread flour plus more for dusting (if you're using non-Canadian flour, Fertig's recipe calls for an additional ¼ cup)
- ½ cup whole-grain flour
- ½ tablespoon fine kosher salt
- 1- 1.25 cups room-temperature water start with one cup and add up to another quarter depending on dryness of dough. You don't want a dough that is too dry
- 1 cup prepared and fed sourdough starter instructions on how to prepare your starter in recipe body
- 3 stalks of fresh rosemary or about ⅛ of a cup
- ¼ cup cornmeal or polenta
- AP flour for dusting
- a tablespoon of olive oil
- 2 cups hot water for broiler pan
For reviving starter:
- 1.5 cups water 380g
- 2.16 cups all purpose flour 325g
Instructions
Revive the starter:
- Two nights before you're planning to bake your bread, revive your starter: remove starter from fridge and let come to room temperature. Stir the starter well to recombine any liquid that may have gathered on the top. Measure out 1 cup of starter.
- Place 1 cup starter in a large jar, bowl, or container, add 1 cup (250g) of water and 1.5 cups (225g) of flour and mix until combined. The mixture will be lumpy, like pancake batter. Cover loosely with plastic wrap and keep at room temperature (I keep my starter on top of the fridge) overnight.
- Refresh it once more in the morning with ¼ cup (65g) water and ⅓ cup (50g) flour, and once again that night with the same quantities (¼ cup (65g) water and ⅓ cup (50g) flour). The starter will be ready to use at night, or the next morning, when it bubbles and smells yeasty.
- You will need 1 cup of refreshed starter.
Prep the bread:
- When ready to bake, chop rosemary finely. Dump the bread flour and whole-grain flour into a mixing bowl, and stir with a wooden spoon to combine well. Add salt and chopped rosemary, and stir to combine.
- Pour in the water and starter and stir together until just moistened. Beat 40 strokes, scraping the bottom and the sides of the bowl, until the dough forms a thick, spongy mass.
- Transfer dough to an oiled crockpot or an oiled large glass bowl. Cover the bowl with plastic wrap or a large plate and let ferment at room temperature 72°F (22 °C) for 12 to 24 hours, or until the dough is bubbly on the surface, has a sponge-like appearance and has either doubled or risen by half. I place my bowl, covered, in a oven that is turned off, or simply under the table in the kitchen.
- Use right away or place the bowl, covered with plastic wrap, in the refrigerator for up to three days.
- When dough is ready, place it on a generously floured surface and dust with more flour. Flour your hands. Using a dough scraper or floured hands, scrape the dough up and over itself, flouring and turning it as you go, for 12 to 15 turns, or until dough is soft and not sticky (this method is fantastic, and the dough is not overworked). Dust very lightly with flour.
- With floured hands, work the dough as little as possible and form it into a wide 10-12 inch batard. Pinch the ends and all seams closed, and lightly flour sticky spots. The dough should be smooth and soft, and not sticky. If sticky, add a bit more flour.
- Prepare a baking sheet or cutting board (the bottom must be flat). Line it with a clean kitchen cloth, or parchment paper, and dust it with flour. Without moving your batard too much, use a dough scraper (or well-floured hands) to slide your dough onto the floured surface.
- Cover the dough with plastic wrap sprayed with oil, oily side down. Let rest at room temperature (again, I use a turned-off oven) for 5 to 8 hours.
Bake the bread:
- About 30 minutes before baking, place a broiler pan on the bottom rack of the oven. Place your baking sheet on in the middle of the oven. Preheat oven to 450F.
- Remove plastic wrap from batard. Using a sharp knife, make three to five crosshatch slashes diagonally across the top of the loaf.
- Very carefully and wearing oven mitts, remove the hot baking sheet from the oven, and cover with parchment paper. Sprinkle the cornmeal on the paper. Using the dough scraper and well-floured hands, slide the bread from the pan onto the baking sheet, taking care to keep its shape. Place baking sheet back in the middle rack of the oven.
- Pull lower rack of the oven halfway out, and pour 2 cups of hot water into the broiler pan. Spray batard with water, but take care not to drench it. Return rack into the oven, and close oven door immediately.
- Bake for 27 to 30 minutes, lightly spraying the loaf with water three times during baking. The bread will be ready when crust is golden-brown. Remove baking sheet from the oven, and, wearing kitchen gloves, remove bread onto wire rack to cool.
Nutrition


Laurie says
Hello! I am anxious to start this recipe. Can I simply convert the measurements given to grams?
Thanks,
Laurie T
kseniaprints says
Absolutely!
Giangi Townsend says
I am always intimidated to make bread. Your recipe is precisely what i needed to get out of my box and give it a good try. Thank you for all the instructions, very helpful.
Kathleen says
I love the article... the recipe... but for a second time, I have made a brick. LOL
First time I thought OH NO I forgot to let rise a second time. Now... I haven't put it in the oven, but my batard doubled in size.... but flat almost flat as a pancake... I don't even want to try baking it. 🙁 With all the effort, it's so not worth it... 🙁
kseniaprints says
Oh no! That's so weird - this recipe is probably the most successful sourdough bread I've found. Honestly, everything varies so much with sourdough... Sorry it didn't work for you
Claire Og says
Is the broiler pan at the bottom very important? I don't have one.
kseniaprints says
Can you use any other pan? The point is to create steam in your oven.
Diane McGill says
Would it be alright to work the dough and shape it while it was on the sheet of baking paper and then just keep it on there as you put into the pan? It makes it easier for me to this, that way.
kseniaprints says
Absolutely! I do this often.
Shelley says
Hi I was so excited to try this bread. As I built a leavin as per your directions I was so hopeful however in the proofing I lost shape ( I think it was overpooofed) and now I have a pancake.
Any feedback ? Should I have built structure through first rise by folding and stretching? I did have it set on counter overnight for 12 hours and it at that point the dough was wild...over proofed?
Ty
kseniaprints says
Yes, def overproofed..... Unfortunately that happens to me sometimes. Sourdough is unpredictable, and now that temps are rising, any proofing outside the fridge should be limited to 6-8 hours...
Try folding and stretching and it may help. I've had good results even if dough has overproofed sometimes!